This way of making pajamas is SO easy!
I found the pattern for making the top part of the pants here; you just measure your child's waist, pick the right sized pattern, print it and add the inseam that you need/want. LOVE IT!
As far as making the shirt, the tutorial I made is below {I think its actually pretty simple}. Let me know if you have any questions or comments. Enjoy!
Materials Needed:
-knit fabric of your choice (the amount you need depends on the size you are making)
-matching thread
-sewing machine
-printed pants top pattern, taped on seam
-pins
-measuring tape
-fabric scissors
-large paper/newspaper (you could tape some pieces together if needed)
-shirt that fits your child well or just a little big (I used one that was a little big and a different one for the long sleeves)
-elastic for pants waistband
Process for Making Pants:
1. Print the correct size pattern you need for the pants top from here, tape together on the seam. Cut pattern out.
2. Pin the pattern on top of folded fabric (so that it stretches horizontally, not vertically).3. Measure your child's inseam (from the crotch down to the floor); use measuring tape to measure from the line on the pattern down to the measurement you took for the inseam (ours was 16 inches). Cut out the fabric (make sure you cut out both layers at once, then you have both pant legs cut out).
4. Remove the pattern and pin the sides (wrong sides together) of the pants from the top to the "corners" of the pants top.
5. Sew with a 1/4 inch seam allowance from the top to that "corner".
6. Once you have done this the pants will look like this (the legs will be free and open but the top will be sewn)...
7. Open the top of the pants and line up the sewn seams; then your pants will line up.
8. Pin the inseam on both pant legs.
9. Sew from the bottom of one pant leg up and around to the bottom of the other pant leg using a 1/4 inch seam allowance.
 |
| Continue sewing one continuous line from one leg to the next. |
This is what the pants should look like at this point.
11. Measure your child's waist; cut a piece of elastic to that length and stitch to make the elastic a closed "circle".
12. Place the elastic over the back seam of the pants (about 1 1/2 inch down from top).
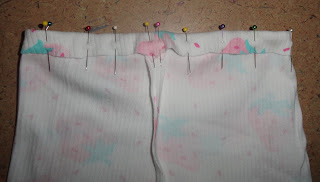
13. Pin elastic in place with elastic up in the fold (not under the pins).
14. Pin the elastic in place on the front seam.
15. Continue pinning all the way around (do not pin the elastic, you don't want to sew on the elastic).
16. Sew around the top with a 1/4 inch from the cut edge.
17. Begin the stitch after the middle of the back seam and end it before the middle of the back seam, like this...
18. Leaving the seam open a little allows you to tighten or thread in longer elastic if needed.
19. To help your child know where the back of the pants are; you can do this. Cut a different scrap of fabric about 2 x 4 inches. {This way you don't need to close the elastic seam either, so if you ever need to access it you can, easily.}
20. Center the scrap rectangle over the middle back seam and fold.
21. Pin in place (making sure that the fold is the same on each side).
22. Sew 1/4 inch from the edge of the fabric.
23. Now you can tell which side is the back.
24. Yippy, the pants are finished!
Process for Making the Shirt Pattern:
1. Place the shirt size you want on top of a large piece of paper.
2. Trace around the shirt; marking where the sleeve is on the shirt.
3. Cut the traced shirt and cut out {I also folded the paper and made sure that both sides were symmetric}.
4. This pattern will be the back.
5. Cut out a second piece the same as the back piece. Cut the front collar line to the same shape as the shirt you are using to make the pattern.
This will be the front pattern.
6. To make the sleeve pattern; trace around the arm of the long sleeved shirt; marking where the seam of the shoulder and armpit are.
Fold the paper on the line that is the top of the sleeve. With the sleeve paper pattern folded, cut out sleeve from the top of the shoulder, down to the armpit, down the bottom side of the arm and at the cuff (do not cut on the fold).
This is what the sleeve pattern should look like.
Process for Making the Shirt:
1. Fold shirt fabric (so that it stretches horizontally, not vertically), pin the back shirt pattern to fabric and cut out the pattern (both layers).
2. Remove the pattern.
 |
| I had a school bus around to help! |
4. Pin in place and cut out the neck line of the front of the shirt.
5. Pin the sleeve pattern to the fabric that you will use for the sleeves (so that it stretches horizontally, not vertically). Cut out two sleeves; fold the fabric and do them both at the same time if you can. {I was using fabric scraps so I wasn't able to fold it; I just cut them out separately.}
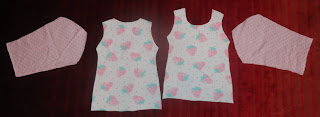
These are the pieces you should now have...
6. With the right sides together pin the front piece to the back piece.
7. Sew the pieces with a 1/4 inch seam allowance on the tops of the shoulders and both sides.
8. Fold the sleeves with the right sides together.
9. Pin sleeves along the bottom of the sleeve.
10. Pin them both so that you can sew them both at the same time.
These are the pieces you will have, ready to assemble.
11. Turn the sleeves right side out. With the shirt still inside out place the sleeve through the armhole so that the right sides are together.
12. Pin sleeve into place, lining up the bottom sleeve seam to the armpit seam; and the top of the shoulder to the top shoulder seam.
13. Sew with a 1/4 inch seam allowance.
14. Repeat with the other sleeve.
15. Turn the shirt right side out.
16. Trim the bottom seams if they don't line up.
Carefully, cut it straight across.
Then, trim the seam at an angle; like this...
Ta da! Your done! You've made an awesome pair of pajamas!
Enjoy!
I made 3 pairs in one day! They really are very simple!
 |
| This pair has fleece (the kittens), it doesn't stretch as much as a knit so you may want to add a couple inches to the width of the shirt pattern to make it fit better if you decide to use fleece. |
 |
| This pair the pants are capris and the shirt sleeves are made from one of my old t-shirts I never wore. |
*Update: I also made a pair for Big Mr J; he loves cheetahs to here they are...
 |
| Running like a cheetah! |


I attempted the shirt tonight, and it turned out okay, but too small. For others who read this, I plan to make a second attempt at the shirt by adding 1/2 to 3/4 inch around all sides to account for the seam. Hopefully that will help! Also, when you pin the sleeves, shouldn't they be pinned with the right sides together instead of wrong sides together. Otherwise it was a very helpful tutorial! I liked the pictures, they really helped me figure out what to do. This has been my first sewing project and I am thrilled that it turned out looking like a shirt!! I'm hoping it will fit one of my daughters dolls (she's 2) so they can match :)
ReplyDeleteThanks,
Carrie