This is truly one of the easiest yeast breads to make, and there is no kneading and it generally takes very little actual hands on time.
I found this recipe from Frugal Living NW. Her husband broke down the cost of this bread, electricity included to a cost of 81 cents per loaf!!! It uses only 1/2 tsp yeast compared to the average packet {2 1/4 tsp} per loaf most recipes tend to call for; then its just water, salt and flour.
Now, I think that in itself is awesome, but this bread is also like the bread you can buy in the store for like $5 a loaf! Why not make it yourself!?!
Ingredients:
-6 cups flour, plus a little more for your work surface
-1/2 tsp yeast {instant or active dry will work}
-2 1/2 tsp salt
-2 2/3 cups cool water
Process:
1. In a large ungreased bowl, combine flour, salt and yeast.
2. Mix to combine.
3. Add cool water.
4. Mix well, the dough should be wet and sticky.
5. Cover the bowl with plastic wrap.
6. Let the dough rest at room temperature for 12-18 hours {the first time I did this recipe I didn't take time to make it before bed after the 12-18 hours, so it was actually over 24 hours; and it worked out just as well as every other time I've made it}. The surface will slightly darken and the dough will smell yeasty and be dotted with bubbles.
7. Lightly flour your hands and work surface.
Dump dough onto floured surface and form into a rough ball.
8. Generously dust a clean cotton towel {not terry cloth} with enough flour, cornmeal or wheat bran to prevent the dough from sticking. Place the dough seam side down on the dusted towel and top it with another towel or if your towel is large like mine loosely pull edges of the towel over the dough.
Allow to rise for 2 hours.
9. When there is only 1/2 hour left of rise time, place a 6-8 quart heavy covered pot, such as a Dutch oven in the oven and preheat oven to 425 degrees.
10. When the dough has completely risen and the Dutch oven is preheated, carefully remove the pot from the oven.
Remove the towel from the top of the dough and carefully flip the dough over into the pot "seam" side up.
Shake the pot slightly to evenly distribute the dough; it will also even out as it bakes so don't worry if you think it looks "lop-sided".
11. Cover and bake for 40 minutes.
12. Remove the cover.
Continue baking for another 15 minutes.
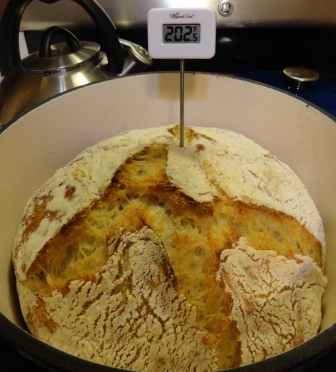
The internal temperature of the loaf should be right around 200 degrees when it is done. {I only checked the temperature on the first loaf I made; I haven't on any others since.}
13. Carefully remove the loaf from the pan {I just dump it out} on to a wire rack to cool completely.
 |
This was the first loaf I made and you can see,
I used too much flour on the towel,
but I just didn't know how much to
keep it from sticking to the towel when rising for 2 1/2 hours!
I still think it turned out BEAUTIFUL! |
ENJOY! You'll never want to pay a small fortune for an artisan loaf of bread ever again!


No comments:
Post a Comment
I love hearing what you have to say; let me know what you think. I look forward to comments and will reply to your comments or questions! Thanks for checking out my blog; come back to visit soon!