Thursday, January 24, 2013

Great Baked Ham Sandwiches

These are absolutely awesome sandwiches!  

You could assemble them all ahead of time, you could then freeze them and then just bake what you need when you need them.

I used my Hawaiian Bread recipe and made 1/3 of the batch into rolls/buns.  The Hawaiian Bread is a fantastic accompaniment to ham!

I found the original recipe for these sandwiches from AllRecipes.
Ingredients for Spread:
-1/2 cup butter, softened
-2 tbsp mayo {I used Miracle Whip}
-2 tbsp prepared mustard
-1/4 cup chopped onion {I used minced dried onion}
-2 tbsp poppy seeds
-salt and pepper to taste

Other Sandwich Ingredients:
-about 2 lb. ham {I used leftovers from my Ham with Ham Gravy}
-cheese, {anything you like, I used smoked Gouda; Swiss would be great too!}
-12 to 16 burger buns {I used my Hawaiian Buns}
Process:
1. Preheat oven to 350 degrees.
2. In a small bowl combine butter, mayo, mustard, onion and poppy seeds.
3. Season with salt and pepper.
4. Whisk together until thoroughly combined.
5. Spread the mixture over both sides of the inside of each bun.
6. Add cheese to each sandwich.
7. Add ham to each sandwich.
{TIP: if you cut the ham into smaller pieces it will be easier to eat.}
8. Wrap each assembled sandwich in foil and place on a baking sheet.  {Or freeze to use later.}
9. Bake for 10-15 minutes or until warmed all the way through.  Bake frozen sandwiches for about 20-25 minutes.
10. Enjoy!

Print Friendly and PDF

Wednesday, January 23, 2013

Headboard Redo

When Little Miss J turned 2 1/2 we decided it was time for her to make the move from the crib to a big girl bed!  

Lucky for use my brother-in-laws family was also making a transition from twin beds to bunk beds, so they graciously passed on this headboard from one of the boy's beds.  

Me being a "re-doer" with all kinds of ideas, decided to take the white headboard and customize it for my little girl who loves rainbows! ... Her cat is even named Rainbow!
So, decided that the side posts should be painted in rainbow order; I started with pink since it's one of Little Miss J's favorite colors.
Materials:
-twin size headboard
-acrylic paint in a variety of colors
-glitter acrylic paint
-assorted rhinestones
-strong glue, like E-6000
-liquid flow acrylic medium, optional {for thinning the white of the clouds}
-gold maker or other marker {used to make the antennae of the butterfly}
* You could prime the original headboard if it is a dark color or has another design on it {I got lucky and this was originally painted a matte white}; if you decide to prime your headboard I recommend using a spray primer, it will take you a lot less time!
 I added the rhinestones to glam it up and make it "pretty"!
I used liquid acrylic flow medium to thin the white for the clouds; this helps to create the "transparent" cloud look.
I also added a rhinestone butterfly; made up of 4 small heart shaped rhinestones.  I used a gold paint marker to add the antennae.
Enjoy!  Get creative and paint your kid's {or your own} headboard to "jazz" up the room!

Print Friendly and PDF

Tuesday, January 22, 2013

Framed Mirror Upgrade

Good morning all!  This was just something I did to change a mirror I had hanging in our living room; I thought it was kind of boring.  So time for a change.

You could do this with any mirror; especially if you had a rectangle mirror you could probably find a replacement frame if you wanted.  

I had the smaller circle mirror from a dollar store mirror that the kids used to use to look in over the bathroom sink; one day the plastic frame broke so I tossed it but kept the glass mirror that was in the frame.

I also had the metal flower decoration that I pulled off a wood box that I bought at Hobby Lobby.

You could also decorate the frame itself with any variety of materials... I though about collaging part of it with pebbles, rhinestones, old costume jewelry, etc.  In the end I decided to go the simple way; I can always add more later if I decide another change is needed.  Enjoy and personalize a framed mirror how you like!
Materials:
-framed mirror (or a mirror and a frame that would fit it)
-smaller mirror the same or similar shape, optional
-tough glue, I used E-6000
-something to decorate the frame

Process:
1. Clean large framed mirror.
2. With the mirror on a level surface glue the smaller mirror in the center of the larger mirror {or off center if you like!}.
3. Allow the glue to dry completely while sitting on a level surface, so the smaller mirror doesn't slide while drying.
4. This is the metal flower I decided to decorate the frame with...
5. Use the same E-6000 glue to glue the decorations to the frame.  {Make sure you are placing the decorations where you want them to be when the mirror is hanging; check the back of the frame to see where the top will be when it is hanging/where the hanging hardware are.}
6. Allow the glue to dry completely.
7. Once the glue is completely dry hang and enjoy your customized mirror!
Sorry, I couldn't get a real good picture once it was hanging; but trust me, it looks great!

Print Friendly and PDF

Friday, January 18, 2013

Sharpen Your Scissors

Have dull scissors?  Sharpen them by cutting aluminum foil with them!  

I know this tip is short and sweet, and oh so helpful; I just need take some time out of my day and sharpen all of my scissors in the house.  Enjoy!

Print Friendly and PDF

Thursday, January 17, 2013

Easy Ceiling Fan Redo... Awesome!

Alright, so we bought our house just over a year ago.  

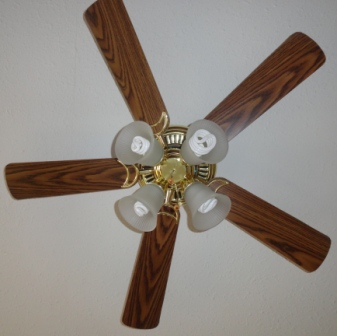
I absolutely love our place, but the previous owners installed "gold" colored fan/lights in the kitchen.  Our kitchen is large and has two ceiling fans/lights in it and they both are what I think is "tacky" gold and "icky" fake-looking wood fan blades.
I wanted to change them somehow, but I didn't want to spend the money to buy new fans!

So, I came up with the idea of painting the existing fans/lights to customize them to our tastes.

After giving my husband some reassurance that this would work and it would look good, and at the very least it would look better than they did before!

Once I had convinced my husband that this was a good idea, we decided we wanted the gold to be painted a Hammered Black and the fan blades to be painted a Dark Barn-like Red.  

We ended up leaving the fan blades, since when we took them down and cleaned them up we saw that the reverse sides were the color of cherry wood, which was actually the exact color of paint we had bought.

This is how we did it...

Materials:
-old/current fan/light fixture
-spray paint primer {we used a gray primer for metal, and this way you don't have to sand the shiny surface to "rough" it up}
-spray paint for the "gold" parts
-spray paint for the blades, optional
-painters tape, for masking
-super glue, optional
-coordinating paint marker, optional
-degreaser, optional {I needed this since the fans were in the kitchen, the blades were greasy to touch and this made cleaning them up a breeze!}

Note: I used less than 1 can of primer for 2 fans and 1 full can of Hammered Black per fan (2 total).

I used Simple Green Degreaser like this, I bought a gallon from Amazon and use it all around the house; its biodegradable and not harsh on your skin...

Process:
1. Remove the fan/light from the ceiling mounting bracket. {This is really the only part that my husband did; I can wire a light bulb, but I just trust him more to do this!}
2. Once the fan is down, take it apart.  Take apart anything that you think will be easy to get back together; it will make painting easier.
3. Wash any parts that are dusty or greasy; you want it to be clean and grease-free for painting!  {Anything that doesn't have wires can be washed in your dishwasher on the top rack if you want.}
I even pulled out the fabric piece that was inside the fan to act as a "filter" to the air that the motor pulls in; I washed it in some warm water with dish soap to dissolve the dust and grease that was embedded in it.  This worked great, just let it dry on a flat surface and be careful not to stretch out the shape.
4. Mask any areas where you don't want spray paint.
I made an "X" of painters tape over the light bulb holes and put a piece of tape over the pull string.
To mask the motor parts and all the wires I just placed a clean plastic container over the parts so they wouldn't get paint on them; this worked really great and was a quick and super easy way to mask these parts!
I used a coffee can on the bottom and plastic container on the top of the motor part; this also gave me a great base to prevent the pieces from having to be turned or tipping over while I was painting them.
5. Now your ready to paint; spray all of the pieces with primer.  You don't need to get both sides of the pieces that hold the fan blades, you won't see the other side.
You can see it was a cold day {hence the snow in the background} when I did this; but it worked.  

Allow the primer to dry completely.  {I didn't bother painting any of the screws.}
6. Next, your ready to apply the first coat of colored spray paint {we used a hammered black}.  Allow to dry completely between coats.
7. Once dry, apply another coat or coats until you have good coverage and the finish you like.  Allow to dry completely. 
8. Meanwhile... since we decided to keep the fan blades the "cherry" wood color I didn't have to paint them.  But I still didn't like the edges of the fan blades {they were a pale-pasty tan color}; so I knew they needed to be painted, but I found the idea of trying to paint them with a brush, tedious!  

So... I decided to rubber band them together and then I used a black paint marker to color the edges.  Let it dry, then move the rubber bands up or down and color where the rubber bands were.
It actually worked great and looked great!
9. Now its time to assemble. {I let the painted pieces sit, inside  overnight to make sure that the pieces were completely dry and wouldn't scratch when I was assembling them.}
I re-assembled the fan on a rug so I had a softer surface in case the pieces could still get scratched.

Since I had taken the fabric piece off to wash it I had to find a way to get it to stay in its place again?! 

So after some thought, I decided to use a little super glue; applied to the metal ring part around where the inside and outside edge of the fabric would lay.  
You just have to hold it in place a little while the glue sets; you will get a little glue on your fingers, that seeps through the fabric.
Remove any masking tape.
10. Assemble the fan as it was before being painted.
11. Re-install the fan/light as it was and enjoy!
Here are both finished fans!  We are SO happy we took the chance and did this!  I love them!
Even my husband said he is impressed with how great they turned out!  

Its like we got brand new fans for the price of a couple of cans of spray paint!  Yay!

Print Friendly and PDF
Related Posts Plugin for WordPress, Blogger...