Wednesday, September 11, 2013

Very Easy Marinated Pork Tenderloin

This is a great and very easy to make pork tenderloin!  I found the original recipe from AllRecipes.  I upped this recipe from a 2 lb. tenderloin to a 6 lb. tenderloin; because that's what I had in the freezer and I knew I would have a use for the leftovers.

All you have to do is place the tenderloin in the marinade and let it sit for at least one hour; I always think longer is better, so I marinated my tenderloin for about 2 days in the refrigerator.

Ingredients:
-3/4 cup olive or canola oil
-3/4 cup soy sauce
-3 cloves garlic, minced
-1/2 cup plus 1 tbsp plus 1 tsp Dijon honey mustard {I used normal Dijon mustard and added about 3-4 tbsp honey}
-salt and pepper to taste
-6 lb. boneless pork tenderloin
Process:
1. Whisk together the olive oil, soy sauce, garlic, mustard (honey), salt and pepper.
2. Pour over pork tenderloin, coating the whole loin; allow to marinate in the refrigerator for at least 1 hour, up to 3 days.
3. Preheat oven to 350 degrees.
4. Transfer pork tenderloin to a baking dish; pour the marinade over the loin.
5. Bake tenderloin for about 45-60 minutes, or until the center temperature reaches 160 degrees.
6. Remove from oven and tent with a piece of aluminum foil for about 10 minutes before slicing.
Enjoy!


Print Friendly and PDF

Tuesday, September 10, 2013

Awesome No Knead Crusty Artisan Bread

This is truly one of the easiest yeast breads to make, and there is no kneading and it generally takes very little actual hands on time.
I found this recipe from Frugal Living NW.  Her husband broke down the cost of this bread, electricity included to a cost of 81 cents per loaf!!!  It uses only 1/2 tsp yeast compared to the average packet {2 1/4 tsp} per loaf most recipes tend to call for; then its just water, salt and flour.
Now, I think that in itself is awesome, but this bread is also like the bread you can buy in the store for like $5 a loaf!  Why not make it yourself!?!
Ingredients:
-6 cups flour, plus a little more for your work surface
-1/2 tsp yeast {instant or active dry will work}
-2 1/2 tsp salt
-2 2/3 cups cool water
Process:
1. In a large ungreased bowl, combine flour, salt and yeast.
2. Mix to combine.
3. Add cool water.
4. Mix well, the dough should be wet and sticky.
5. Cover the bowl with plastic wrap.
6. Let the dough rest at room temperature for 12-18 hours {the first time I did this recipe I didn't take time to make it before bed after the 12-18 hours, so it was actually over 24 hours; and it worked out just as well as every other time I've made it}.  The surface will slightly darken and the dough will smell yeasty and be dotted with bubbles.
7. Lightly flour your hands and work surface. 
Dump dough onto floured surface and form into a rough ball.
8. Generously dust a clean cotton towel {not terry cloth} with enough flour, cornmeal or wheat bran to prevent the dough from sticking.  Place the dough seam side down on the dusted towel and top it with another towel or if your towel is large like mine loosely pull edges of the towel over the dough.
Allow to rise for 2 hours.
9. When there is only 1/2 hour left of rise time, place a 6-8 quart heavy covered pot, such as a Dutch oven in the oven and preheat oven to 425 degrees. 
10. When the dough has completely risen and the Dutch oven is preheated, carefully remove the pot from the oven.  

Remove the towel from the top of the dough and carefully flip the dough over into the pot "seam" side up.

Shake the pot slightly to evenly distribute the dough; it will also even out as it bakes so don't worry if you think it looks "lop-sided".
11. Cover and bake for 40 minutes.
12. Remove the cover.
Continue baking for another 15 minutes.
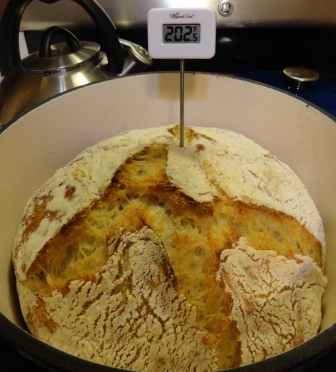
The internal temperature of the loaf should be right around 200 degrees when it is done.  {I only checked the temperature on the first loaf I made; I haven't on any others since.}
13. Carefully remove the loaf from the pan {I just dump it out} on to a wire rack to cool completely.
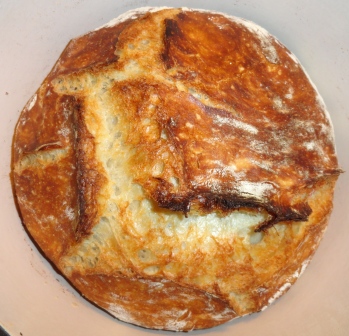
This was the first loaf I made and you can see,
I used too much flour on the towel,
but I just didn't know how much to
 keep it from sticking to the towel when rising for 2 1/2 hours!
I still think it turned out BEAUTIFUL! 
ENJOY!  You'll never want to pay a small fortune for an artisan loaf of bread ever again!

Print Friendly and PDF

Friday, September 6, 2013

Slow Roasted Pork Shoulder

Fantastic and really easy way to make a pork roast!  
I haven't tried it, but I think this would also be great cooked in the crock-pot on low all day!  I think pork chops would be great marinaded in this seasoning mixture and then fried, broiled or grilled!
Ingredients:
-3 1/2 to 4 lbs. pork shoulder roast {also called a Boston blade roast or a Boston butt; you could probably use any pork roast}
-1 tbsp dried crushed red pepper flakes {I only used about 1 tsp, to lower the heat for the kids}
-1 tsp garlic powder
-1 tsp ground ginger
-2 tbsp salt
-1 tsp ground pepper
-2 tbsp brown sugar
-2 tbsp olive oil
-2 tbsp red wine vinegar
Process:
1. Preheat oven to 500 degrees.
2. Mix together the red pepper flakes, garlic powder, ginger, salt, pepper, brown sugar, olive oil and red wine vinegar.
3. Place the roast in a greased baking dish.  Pour the seasoning mixture over the roast; make sure you lift the roast to allow the seasoning to seep under the roast.
4. Bake the roast for 20 minutes at 500 degrees, then lower the temperature to 250 degrees and cook for another 2 hours; until the roast is golden and has an internal temperature of 165 degrees.
5. Remove the roast from the oven and loosely cover it with  foil and allow to rest for 15 minutes before slicing.  {This allows the roast to retain its moisture when you cut it.}

You can see how moist this roast turned out! 
6. Slice and enjoy!  

Print Friendly and PDF

Thursday, September 5, 2013

Summer Roasted Vegetables: Broccoli, Cauliflower, Green Beans OR Carrots

Roasting vegetables is in my opinion the easiest and most tasty way to prepare most if not all of summer's fresh vegetables.
I have always enjoyed roasted vegetables and I find myself doing often throughout the summer.
I found this BEAUTIFUL purple cauliflower at the farmer's market!
Ingredients:
-fresh summer vegetables {carrots, broccoli, cauliflower or green beans, or any other fresh veggies you have, such as zucchini, tomatoes, onions, peppers, potatoes, etc.}
-olive oil or other vegetable oil {always use olive and/or canola oil}
-salt
-pepper
-freshly minced garlic, optional {I usually use only when I have time or feel like adding a little "garlicyness" to the veggies}
*You could also add any fresh herbs that compliment the veggies you choose.
Process:
1. Preheat oven to 400 degrees.
2. Chop or dice vegetable into same sized pieces.  {For green beans, just wash and/or trim if necessary; I don't usually trim them.}
3. Place veggies in a medium/large bowl depending on how much you have.
4. Drizzle with oil, sprinkle with pepper and generously with salt; add fresh minced garlic, if using.  Toss well to coat all pieces.
5. Place vegetables on a baking sheet; I like to line the baking sheet with parchment paper or foil.
6. Bake vegetables for 30-40 minutes, depending on the veggie and how roasted you want them.
7. Remove from oven and enjoy!
Note for leftovers:  I love to use leftover roasted vegetables in scrambled eggs in the morning!  I like to put the scrambled eggs with the roasted veggies over a slice of toast spread with coconut oil... oh so tasty!  This is usually how I use all of the leftovers; if there are any.  I also love the green beans just cold from the fridge for a quick, healthy snack!


Print Friendly and PDF
Related Posts Plugin for WordPress, Blogger...